Showing posts with label technology tutorial. Show all posts

Nov 28, 2011

Christmas Countdown Board

You probably didn't see this, but about a week or two ago I guest posted on Sugar Bee Crafts. (exciting!) So, I am reposted my project for all my favorite readers! and you get to know a little tidbit about me too...bonus!


Hey everyone! This is Jen from lil Mop Top. As you can assume, I am super excited to be guest posting today at Sugar Bee Crafts. {yay!!} So before I show you to make a Christmas Countdown Board for your own family, let me tell you a bit about myself.


I am lucky enough to be married to my best-friend, Brad, and we have two precious baby boys. (I can call them babies forever, right?!). John John turns 3 next month (be sure to check out his birthday party on my blog soon...so cute!) and Matty B is 16 months. They are both the sweetest and cutest boys EVER! I was a high school math teacher for 8 years and decided to stay home with the boys when Matthew was born...and I am LOVING it!

I am always gathering ideas around the internet to do activities and fun stuff with the boys, so my Christmas Countdown Board is perfect for our family. I used library card pockets and library cards to make a different activity each day for us to do in December as we countdown to Christmas. Here is how I made mine, but of course you can vary this in so many ways to fit you perfectly!

All of the supplies I had around the house so you could do this project for 'free' using things around your house.

First I took a thick black poster board and painted it white. I wanted it to look a little distressed so I painted it unevenly because I didn't know if I could sand poster board. (Hind sight, I wish I had painted this green or red, but too late now!)


While the paint was drying, I used Christmas scrapbook paper to cut out small pieces of paper to cover some card pockets I had in my stash. I cut each piece 3.5"x2.5" but you would have to cut yours to size.


Then glue a piece of cut paper to the front of each card pocket. My favorite helper (Brad) glued while I stuck the paper on which made this part of the project take about 1 minute.


Then I printed and cut the library cards.


Once the paint on the board was dry, I laid out the cards how I wanted them (eyeballing my spacing because I am too lazy to get out a ruler and do the math...but I COULD do the math if I wanted because, remember, I was a math teacher!) Then I stuck the card pockets on the board (they were the self-adhesive kind...awesome!).


This looked pretty plain the way it was and I didn't have an actual frame to put this in. So, I found a spot in the house where I had a mirror hanging above a painted dresser. (My sisters painted the dresser and I love it! Check out their blog, Refreshingly Chic).


I used tape to hang the the board on the mirror so it looked like it was being framed. Right now I don't have my holiday decorations out, but it will look super cute when I get all my junk out of the attic. :)


Like I said, this is very easy to vary to put your own creative spin on it. I thought about making it into a banner for the mantel, but since the boys are so young, I didn't want them pulling it down. If you have 25 Christmas books, it would be SO cute to put a card pocket in each book and the kids pick a new book each day and the card has the activity for the day after reading it. I bet you can come up with something really cute!

I have a document HERE with the library cards with my activities (I found most of them at various sites such as The Activity Mom) and I also have a blank library card HERE if you want to add in your own activities.

Thanks again to Mandy for letting me invade her space at Sugar Bee Crafts! Be sure to stop by my blog at lil Mop Top where you can find a variety of fun crafts such as...

Easy Fabric Roads:


Cozy Flannel Blanket:


and lots of ideas for learning activities/lessons for toddlers such a feeding Cookie Monster during our baking themed week:


Please be a fan of lil Mop Top on facebook!!

Jun 21, 2011

Pirate Party Shirt [Tutorial]

Remember these precious pirate party invites? Well, here is another little sneak peek for you!

Big Brother can't go to the party without his very own pirate shirt! Matty B will be wearing a water shirt with a skull and bones, so he is set. So I wanted to make sure John was festive too! This is what I came up with...trying not to make it to 'skull-y' because I don't really love skulls on babies. :)


I think this shirt turned out with a perfect mix of pirate and party. Don't you?!

So, let's get down to the nitty gritty of how to make this precious shirt. (If you aren't super crafty and want to buy one of these pirate shirts, go HERE!)

Supplies:
-t-shirt (I got mine at Walmart and had to take off the front pocket first)
-fabric paint, paint brush
-freezer paper
-iron
-small scrap of fabric
-fusing (like Heat N Bond)

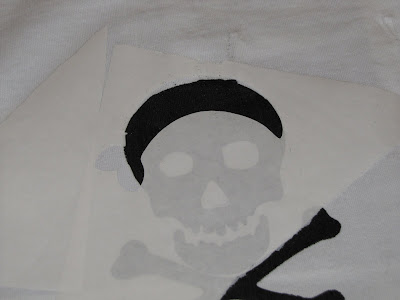
1. I found a picture of skull and bones online from Polish the Stars. Then I used my Sure Cuts Alot to cut out the image onto freezer paper on the circut. (I am still LOVING the cricut! My mom had to give the 'the talk' about sharing with my sisters. Bet she didn't think she would have to do that with her 30 year old daughter!).

2. Iron the freezer paper to your shirt. Then fill in with black paint. If you need more specific directions on freezer paper and using the cricut, see this old post: HERE


3. Remove freezer paper from shirt and it should leave the skull and bones neatly painted on your shirt. Awesome!

3. I used a cricut cartridge I had on hand to cut out a bandana shape. (It was the paper doll cartridge which has super cute stuff on there!). I ironed it on top of the skull, but be careful because the paint will smear. So try not to smear black paint all over your shirt! Then fill in with red paint. This took several coats to cover over the black skull.


4. After removing the freezer paper, I used the end of a paint brush to add white dots to the bandana. I did this to help blend the red because it didn't cover the black evenly.


5. I made a little party hat by cutting a small triangle from my scrap material. I then used fusing (ie Heat N Bond or Wonder Under) to iron it to the shirt. Again, be careful not to smear paint all over your shirt! I then took small strips of the scraps to make a little poofy part for the top of the hat. I sewed those directly to the shirt. And because I want to be extra cute, the scrap material is from a fabric bunting I am making for party decorations. John will match the decor! hahaha!


And there you have it. A precious pirate party shirt. I can't wait for John to wear it at the party! Like I said before, keep checking back to see what else I have up my sleeve for this party!


I link up to these parties!

Jan 24, 2011

Play Table Cover

Santa brought John and Matthew a new table and chairs this year. Isn't he sweet?! I am still in the phase of trying to keep it clean (we will see how long that lasts!) so I made a table cover for it to use when John is painting, glueing, coloring, etc. Since we are about to start some Valentine's activities for tot school, I made this cover with Valentine's material. I will make another more generic one (and less girly!) after February is over.


Supplies:


Table cloth (I got this one for $5 at Walmart and ended up with TONS left over. I will probably make a mat out of it to put down to protect the new wood floors!)
**Could also use oil cloth but I was already at Walmart and didn't want to run to JoAnn's!**
Elastic
Heavy Duty sewing needle
Table duh!
misc sewing supplies like thread, sewing machine, scissors, etc

1. First I turned the table over and laid it on the back of the table cloth. I figured I needed to make the cover 7 inches bigger than the table (to cover around the edges and have room to make casing for elastic), so I marked 7 inches around the table.


2. Using my marks, I cut out a circle from the table cloth. It wasn't very exact but it didn't matter that much since it would be gathered and hidden.


3. Fold over your cloth to make a casing for the elastic. My elastic was 1 inch wide so I folded the cloth over 1.5 inches and pinned all the way around.


Here is what it looks like when it was pinned all the way around.


4. Sew around your casing at the end of the fold closest to the CENTER of the cover. Remember to leave an opening when you sew so you can insert the elastic! I make an 'X' with my pins so I remember to stop sewing otherwise I get into a sewing trance and will keep going without leaving the opening...and then I get upset when I have to rip out stitches!


5. Attach a big safety pin to the end of your elastic and start pulling it through the casing. This was the longest and most boring step for me!


6. I then put the cover on the table to see how tight I wanted the elastic to be. Once I found a length I liked, I pinned the elastic, removed the cover from the table and sewing the elastic ends together. Cut excess elastic and then sew up hole on the cover.


...and you are done! Your very own custom cover! It was really easy to make, took less than an hour, cost very little to make, and now the boy's table will stay clean for a little bit longer.


I link up to these parties!

Oct 14, 2010

Google Reader = My Addiction

I started blogging as part of an assignment when I was taking a professional development class about 2 years ago. I had never really seen blogs before (guess I am SUPER behind the times!) and didn't really know what they were for. The point of the class I was taking was to learn more ways to bring technology into the classroom and although I still don't know how I would use a blog in a high school math class, I have become almost addicted to reading blogs to get new ideas for all kinds of areas in life. As far as education, I honestly feel I got more ideas for my classroom by reading blogs compared to sitting through professional development that the school offered. I guess that would make sense considering usually professional development is general and I can use blogs to address specific and personal needs. I love that I can learn new ways to teach my class (when I was still teaching!) as well as find activities to do with my sons, get ideas for birthday parties, holiday decorating, baking, keep family members in the loop on our lives...you name it, it is out there which is so awesome!

Anyways...this is a long way to get to my point of this post. I learned how to use Google Reader in this class. I was so confused at first- what the heck is a feed burner? a reader? a subscription? But once I started using it, I realized how awesome it is! I know there are more ways to keep up with blogs but since using Google Reader is the only 'organizer' I learned to use, this is what I am going with here. :)

So, I am going to show you how to set up a Google Reader so you can easily keep up with all of your blogs in one place! (If you are like me, you might be following or subscribing to about 100 blogs which can be overwhelming!). And I know the pictures are small, but you can click on them to enlarge!

1. First you need to make a google account if you don't already have one. Then sign in!

2. Go to 'My Account' and click on 'More' at the bottom left.


3. Find and click on 'Reader' on the right column.


4. I always click on 'All Items' on the far left column. If you don't follow any blogs or subscribe to any blogs, your reader will say "Your reading list is empty". If you do follow blogs (which I am sure you do!), it will list the blogs you follow and any posts that you haven't read. Awesome!

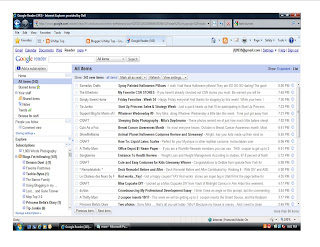
Here is what my reader looks like:


Yikes! It is showing that I have over 300 posts I haven't read yet. But, that is because I subscribe to SO many blogs that I tend to only read the posts that interest me and not EVERY SINGLE post that is written. Sorry guys!

If you follow any more blogs, they will automatically be added to your blogger. So now you can just go straight to your reader to see all the new posts on your favorite blogs instead of jumping from website to website to website to website...

At the bottom left, there is a link to 'manage subscriptions'. You can go there to delete and update your reader.

Want to learn more about how to add subscriptions to your reader? Check back soon for another 'how to' for the google reader! :)


I link up to these parties!