Oct 31, 2011

Tot School - Halloween Edition

Happy Halloween!!! As you are reading this, I am taking the boy's to Brad's work for the big Halloween celebration. WOOHOO!

The last two weeks I had out our Halloween themed activities for tot school. John and Matthew played with everything throughout the two weeks, but of course I didn't get pictures of most of it. It is really hard to take pictures now when I am trying to get two kids to do the activity (or two activities at one time!), trying to keep them from fighting over a toy, and trying to keep Matthew from falling out of his chair or eating pieces of a toy. Soooo...pictures are slim right now. I had all the activity pieces out on the shelf and they just would pick and choose from what was there so we basically are having 'educational play' for about 45-60 minutes each day. If nothing else, it gives us a break from playing with the same ol' toys in the living room!

However, we did a lot of fun things! Here is what I managed to actually photograph:

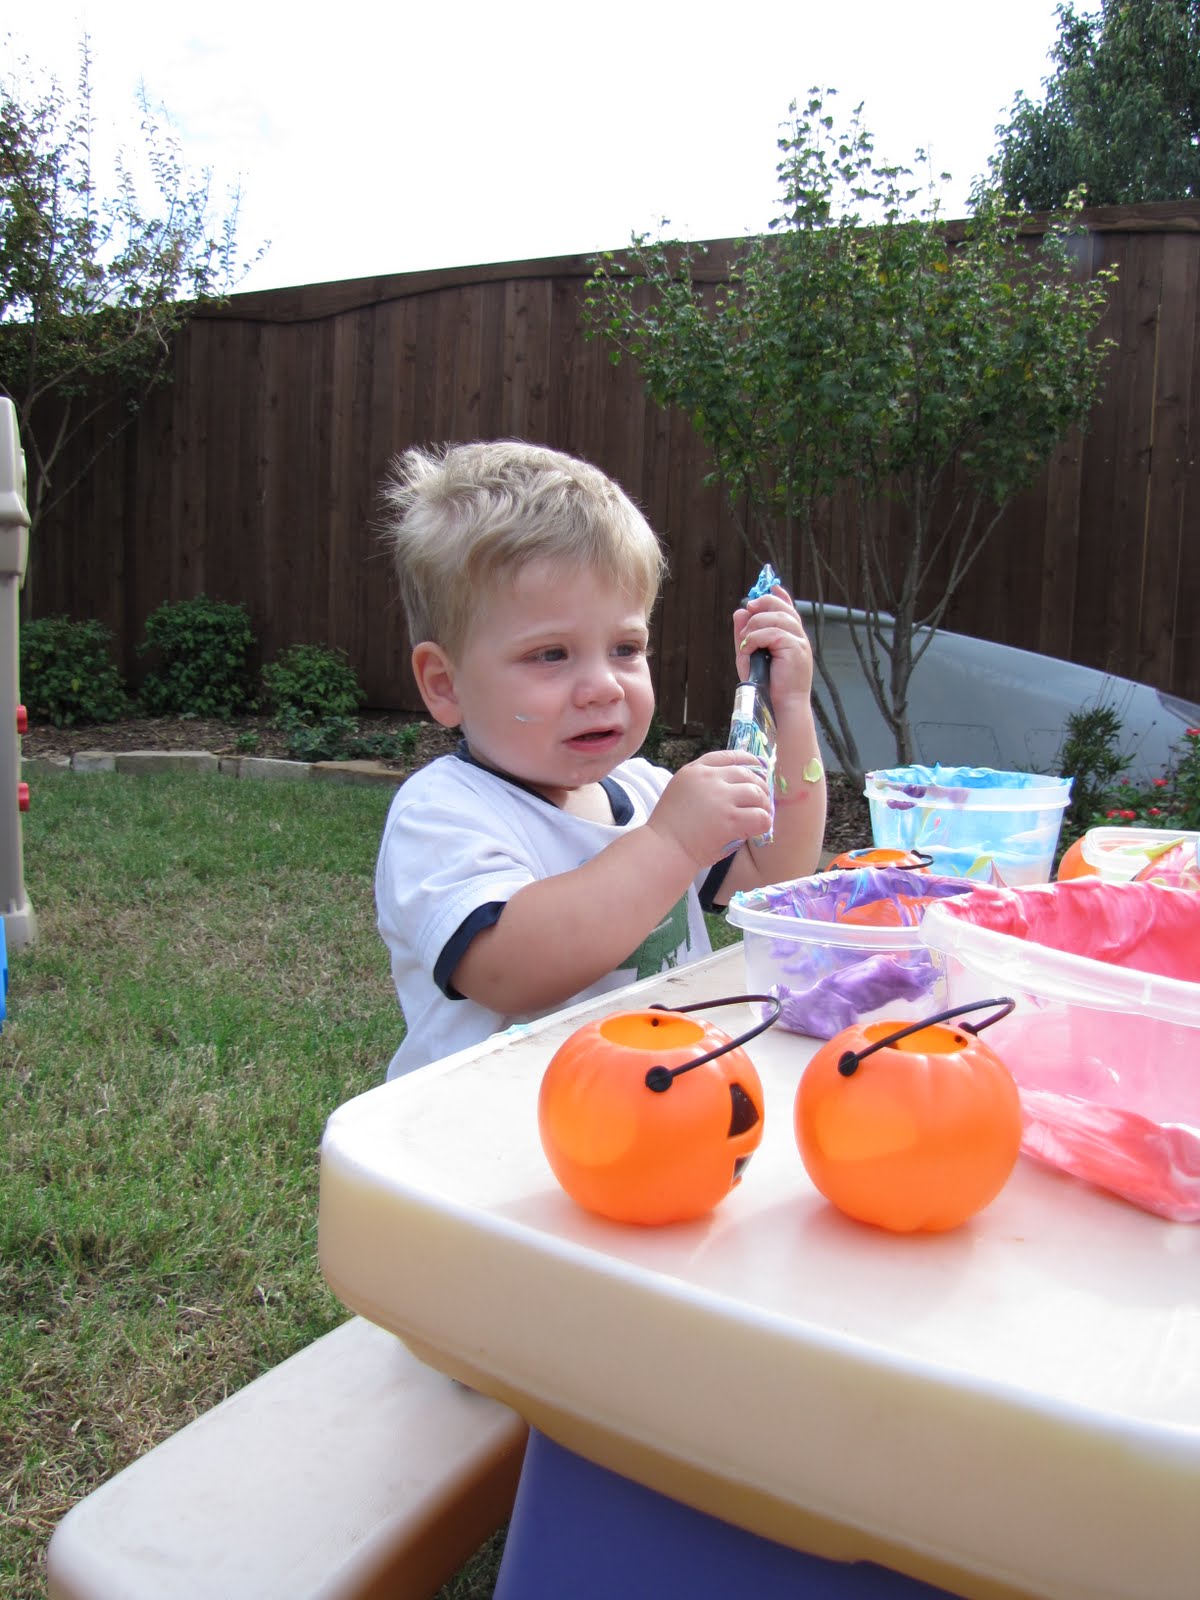
1. Shaving Cream Pumpkin Painting:
I used food coloring to dye shaving cream. Then the boys painted plastic pumpkins outside in the backyard. This quickly evolved to painting their hands and baths were needed right afterwards! But they of course had fun with this activity.


2. Counting Pumpkins:
I got this activity from Confessions of a Homeschooler. John is really into counting right now and did this perfectly!


3. Skeleton Puzzle:
I made this skeleton puzzle last year using a plastic skeleton from the dollar store. Basically I traced around the skeleton on a folder and then took apart the skeleton. Very easy. John really liked putting this together this year and did this several times. It was interesting because he could fill in the traced outline, but if we took away the folder, he couldn't put the skeleton together very well.


4. Pumpkin Patch:
We made the annual trip to the pumpkin patch with Nana. The boys had fun checking out the pumpkins, jumping in the bounce houses, and taking a mini train ride!


5. Cookie Cutter Prints:
We pulled out the Halloween themed cookie cutters and used them to make art prints. Again, this evolved to John painting his hands...and Matthew trying to eat the paint!


6. Halloween Collage:
We made collages from a Pottery Barn Kids catalog. I am posting more about this tomorrow for Toddler Art Tuesday!


Other things we didn't get pictures of:
-color pumpkin puzzle from Confessions of a Homeschooler.
-candy corn letters (that I posted about HERE)
-pumpkin patch letters (that I posted about HERE)
-monster math from No Time for Flash Cards
-spider leg counting from Little Family Fun (with Uno cards instead of die!)
-Mr. Pumpkin Head (that I posted about HERE)
-pumpkin toss (tossing small plastic pumpkins into a larger plastic pumpkin)
-sorting Halloween erasers in a muffin tin
-playing with a VERY mini sensory bin of spiders and skeletons

WOW- you know, I always feel like I should be doing more with the boys and I am slacking on these tot school things. (I mean, have you seen other people's blogs? They are hardcore and sometimes make me feel like I am failing or something!) But when I write it out, we do more than I realize and even though I could always do more, I shouldn't beat myself up about it!

Please be a fan of lil Mop Top on facebook!! I link up to these parties!

Oct 27, 2011

Teaching Thursdays - Halloween Treats

So, obviously Halloween is on Monday. For all you teacher out there, do you give your students candy on Halloween? On any major holiday (Halloween, Valentine's Day, Christmas, etc), I would jump back and forth between giving candy or holiday pencils. Pencils sound so dorky, but they are so much more pratical than a piece of candy! I usually bought them in the dollar section of Target or at the Dollar store. I would stand at the door between classes and hand out the pencils as students were walking in. Not one kiddo ever complained about getting a pencil and I saw those being used for several weeks after being handed out.

Speaking of pencils, when my MIL threw our rehearsal dinner, she put pencils in little goodie bags that said 'Brad & Jen - July 2006'. She gave me all the extras so I used those in class for the kids who forgot their pencil. It was pretty funny because kids did NOT like getting those pencils for some reason! I guess they were embarassed to use a pencil with writing on it??? As usual, those pencils ran out pretty quick since students don't usually return pencils in high school. Anywho, one day I was talking to my Assistant Principal in his office and wouldn't you know- he was using a Brad and Jen pencil! He said he probably picked it up off the floor in the hallway one day. Pretty funny how that pencil got back to him!

Please be a fan of lil Mop Top on facebook!! I link up to these parties!

Oct 25, 2011

In Case You Missed It...

I posted about these Halloween Shirts last year. So, in case you missed it, I am reposting this for all you readers out there who need shirts for boys. Because, let's be honest, there isn't much out there for boys, yet TONS for girls! Don't get me started...

From last year:


Well, Halloween is this weekend and I never bought John a Halloween shirt! I made this one but he has only worn it once or twice. Is it just me or is it hard to match a grey shirt with shorts? (...assuming you are like me and don't have black shorts for your kid right now!) It is too hot to wear jeans, and quite frankly it is hot to wear long sleeves past 10 am!

So, I decided he need something a little snazzier for Friday when we are going to Brad's work where they have a HUGE Halloween celebration. The office is just short of shut down for most of the day as they put on skits, play games, and entertain. It is so fun! So, I had a black shirt from Walmart (still long sleeves, but oh well!) and I made a Halloween version of the 4th of July shirt.


If you kind of squint so that the white lines don't look so wavy, it is a pretty cute little shirt! I can't wait for John to wear it Friday and it is perfect because it will match Matthew's outfit which is also a black shirt.

So, which shirt do we like better? The graphic...


...or the argyle?


I can't decide which to put him in at the Halloween party on Sunday!


Please be a fan of lil Mop Top on facebook!! I link up to these parties!

Oct 20, 2011

Guest Blogger - Emily

Hi there lil Mop Top readers! My name is Emily from Refreshingly Chic and Denson Duet. I also happen to be Jen's sister. I am so excited to be guest posting today and sharing a fun and EASY project with you today! You will leave this blog knowing how to make these sweet clothes dividers which is perfect for nurseries!

>IMGP0992

But, first, I wanted to share a little bit about me. Most importantly, I just had a sweet little baby named Emma. She is only one month old, so having time to do crafty stuff is not really happening right now! But before Miss Emma arrived, I had been working with our other sister, Allison, on our furniture refinishing items for Refreshingly Chic's clients. We love taking old pieces and giving them a face lift and new life! At Denson Duet, I share ideas for wreaths, seasonal decorating, and more wreaths!


So, let's get started on today's project...

After seeing these adorable closet dividers on Pinterest (most addicting site in the world) I decided to give it the good old college try.  Thankfully, it was really easy to do.  Here is what you need:
IMGP0975IMGP0976IMGP0977

Go to Container Store (at least that is where I went!) and get as many dividers as you want.  They were $.99, so this is really all you will spend money on.  I got 5 because I didn’t think I would even need all 5, but it sounded like a good amount!  You also need scrapbook paper and Zots.  I am sure all of you crafter have this.  You could use any other kind of adhesive, but I thought Zots worked really well.

The first thing I did was trace one of the dividers onto computer paper and cut it out.  Then, I taped it to the actual divider and traced the inside lip on the paper.  I wanted the white to show a little but that is completely up to you.  After I cut it out to the right size I glued it to a a spare piece of cardstock and cut it out.  I wanted my template more sturdy so that I can use this again for baby shower gifts for friends.

IMGP0979IMGP0981IMGP0982

Now all you have to do is trace your template onto all the scrapbook papers that you wanted.  I did 10 pages so I would have enough for the front and backs of the dividers.  I can use them on either side of the closet!  After you trace, you cut… duh!  This was the longest process, which should show you that this is a very easy and quick project.

IMGP0983IMGP0984IMGP0985IMGP0986

With your Zots (or whatever you are using) glue the cut outs to the front and back of the dividers.  And, done!!!

I actually inked all the edges in light pink.  Not sure why but I did.

IMGP0989IMGP0990

And, here they are in Emma’s closet!!!

IMGP0991IMGP0992

All in all this was a super easy and cheap project!  Took me an hour total and cost me less than $6.  That, I can handle!


Please be a fan of lil Mop Top on facebook!! I link up to these parties!

Oct 19, 2011

Favorite Things Party

About two weeks ago, I hosted a 'Favorite Things Party' at my house as a Girl's Night In. I saw this idea on pinterest and it was so cute! Here is what we did...

**Fair warning- all my pictures turned out SOOOO blurry! I am so upset! So, I apologize upfront for poor picture quality. **

All the guests were told to think of their favorite thing and bring three of that favorite thing. I put a limit of $6 per item just to keep us from spending tons of money. For example, I love using big icing tips to make pretty cupcakes that look somewhat professional so I gave away icing tips, decorating bags, and sprinkles.

When the guests showed up, each person wrote their name on three sheets of paper and put it in a bowl.


After having time to chat and snack on our favorite appetizers that we all brought, we each took a turn explaining our favorite item. Then we drew three names from the bowl and gave away our favorite item to those lucky ladies. It was really fun to see everyone's favorite things and go away with new loot! I got awesome lip balm from Cooper Aerobics, yummy smelling candles from Bath and Body Works, and Jergen's Natural Glow tanning lotion.


Quinn got a pretty wreath from my sister that is prepped for a personalized monogram.


Sarah gave out pretty eye shadow.

To carry said loot, I had bags ready for each person. I really wanted brown craft bags but couldn't find them at Walmart so blue was the 2nd runner up. Inside the bag I put a notepage for people to write down anything they wanted to remember for later (brand names, flavors, etc). I think it was a nice touch, but I am pretty sure only one person wrote anything down. :)


As far as decorations, I put a couple food labels on the table for the favorites I had out (drink, dessert, and appetizer) and a sign I made the night before (mod podged to a scrap piece of plywood). I had grande ideas to make this all spiffy and decorated, but it just didn't happen.


Like I said, we had so much fun and it was nice to try something different with friends! I have seen several variations and modifications for this party so check out pinterest for more ideas if you are going to throw one of these parties yourself. It would be so cute if you did an Oprah theme with it because I totally felt like Oprah when I was getting ready for the party!


Please be a fan of lil Mop Top on facebook!! I link up to these parties!

Oct 18, 2011

Halloween Party - 2010


You read the post title correct- this post is about my Halloween Party from last year. I never posted about it so I figured I would do it now so if anyone wanted to use my ideas, they had time to get it all together!

So, only one year late, here is what we did last year for our fun party!

Prior to the party, John helped me paint toilet paper tubes orange. Then we made them into pumpkins. At the party, I 'hid' them in the front yard so John and Bella could hunt for pumpkins. They really liked this game and wanted to play it a couple times.


I took our bowling set and cover the pins with tissues to make ghosts. Then we used a small pumpkin to bowl. All family members played this and Aunt Emily won! She got a cute little bucket of candy for her prize.


The adults also played a partner game. The guys taped a cup around their chest and the girls had to throw ping pong balls into the cup. The original plan was to throw eggs, but considering my son is very allergic to eggs, having broken eggs around wasn't a good idea. This was a funny game to watch...and the pics turned out funny as well!


I made two Halloween themed foods- mummy hot dogs and severed fingers. The fingers looked so real and gross in person. They were almost too creepy to eat!


Now I need to get my butt in gear and plan this year's party! Thankfully I just went to a friend's party who did a fabulous job of activities so I have plenty of ideas now. :)

Please be a fan of lil Mop Top on facebook!! I link up to these parties!