Jul 31, 2014

Shooting in Manual - Outdoor

Hi there photographers!!! I hope that we are starting to get the hang of switching up the settings on our cameras around the house. Remember, it takes time to get quick at it but I promise that you will get faster and be able to change the settings before your kid runs off to the next part of the house!

Since we talked about shooting indoors last time, today we are going to practice shooting in manual outdoors. (If you have a point and shoot, this may not apply much to you but please feel free to practice taking pictures outside to see what your camera can do!) All the settings still change the same way, but now you will typically have much more light than you do indoors. You probably had low shutter speed, low aperture, and high ISO inside. The opposite will be a good starting point for taking pictures outside; high shutter speed, can do a higher aperture if you want, and lower ISO.

Quick Reminder from yesterday:
1.SS- higher makes the picture darker, lower makes the picture brighter, need higher for more movement
2. Aperture- higher makes the picture darker, lower makes the picture brighter
3. ISO- higher makes the picture brighter, lower makes the picture darker

If you are outside, lots of people aim for 'open shade'. This is where you are in the shade (duh!) but you still can get nice light on the people's face and catch light in their eyes. So you can sit towards the edge of the shade under a tree, for example, and still face the sun without squinting or having harsh light then it would likely be a pretty picture. However, probably like your kiddos, mine aren't inclined to play nicely in pretty positions in open shade all the time. So you need to be able to take photos anywhere outside.

Using the same thought process as last time when we discussed indoor photos, let's practice outdoor photos!

1. SS: I usually start around 1/500 depending on the time of day and if I am in the shade or not.
2. Aperture: I still like to use low aperture b/c I like blurry backgrounds. But you can bump this up especially when shooting a lot of people in the frame.
3. ISO: If it is during the bright part of the day I start at 100. If it is towards the end of the day I start at 400 since it will be getting darker the longer I am outside.

Here are some outdoor examples.

1. Thomas playing in the fountains: Definitely not open shade, but this was in the morning around 10am.
ISO 200, F3.5, 1/4000
Low ISO since it was bright outside and high SS since it was bright


2. John at the ballpark. This was open shade since we were in the shaded part of the stadium.
ISO 800, F4.0, 1/640
SS is lower than the previous picture since this wasn't as sunny being that we were in the shade and this was about 6:00 p.m. However, the SS is much higher than when I was taking photos inside since I don't need as much light in my camera when I am outside.

3. Playing at the lake. Not open shade, morning sun.
ISO 200, F4.0, 1/2000
Since it was bright out, high SS helps keep too much light from entering the camera.


4. Boys at the lake: Not open shade, morning sun. However, if the hat were big enough, and we were facing the sun, it could put some shade on Matthew's face and create open shade.
ISO 200, F3.2, 1/1250
Again, lower ISO since we are outside without shade to block the sun, and higher SS to take a faster picture to block out more of the light.

5. Thomas playing during 'golden hour' which is the 2 hours before sunset. You can see how pretty the light is coming through the trees behind him.
 ISO 1600, F4.0, 1/800
He is facing away from the sun so that is why I upped the ISO. I probably could have also lowered the SS to help let more light in the camera instead of upping the ISO.

 6. John and Matthew in the garage. Remember last time I said that you could take pictures the edge of your garage and most of the clutter would be hidden? Here is an example of that! Their faces are lit since they are right at the edge of the garage so they are also in open shade.
ISO 800, F2.2, 1/1000


7. Large family at the beach:
ISO 400, F4.5, 1/500
This one is back lit which is more tricky. I raised the aperture since I have several people in the picture. It was at night so I left the ISO at 400 so I wouldn't forget to change it as it got darker.

A couple notes:
-Taking pictures at noon is not a great idea because that will be harder to do. If possible you might avoid that.
-Taking pictures early in the morning (as the sun is coming up) and at the end of the day (as the sun is setting) will give really pretty light. Those are my favorite times to take pictures (although not always opportune times with little kids and work schedules!) If you are hiring someone to take your family photos, be sure to get those time slots to get the prettiest pictures.
-Since your SS usually will be high, your photos shouldn't be too blurry due to movement. This means that you should be able to catch your kids as they are running and still get a great photo!
-Since I am still pretty new, there are times we are playing outside and it is bright and I can't see my screen very well and I can't seem to get my settings right and, and, and, and....then I just put the camera down and forget about it. Unless it is a birthday party or something important, then it isn't worth the frustration to me. I will just try again later. No big deal!

Time for you to go outside and practice! Practice finding shady spots and sunny spots so you can change up the settings. Try facing your subject towards the sun to get the catch lights in their eyes. Also practice putting the subject several feet away from the background (ie the wall, fence, bushes, etc). This will change the depth of the photo too. Share some of your favorite shots, even if they aren't perfect!

Experienced photographers- feel free to share tips or more info on facebook. Perhaps you can try some new photos outside over the next couple days: new locations, a garage photo shoot, taking a wide angle if you usually use narrow. Maybe take photos of of an activity outside that is usually done inside (ex: bubble bath, eating breakfast). Take a photo of outside nature or pets if you usually take a photo of people. Take a photo of a small toy in random open shade locations (mailbox, anyone?).

Next time we will talk briefly about focus points. See you then!

Please be a fan of lil Mop Top on facebook!! I link up to these parties!

Auto Focus vs Toggle Focus

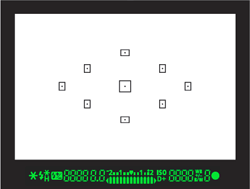
One thing I was always frustrated with on taking photos was the focus. Actually, I still get frustrated with that and am rarely 100%  happy with my focus. However, what I found to be the most helpful thing is to use the toggle focus feature on my camera. Instead of using the auto-focus where the camera picks what it thinks should be in focus (don't tell me what to do, Mr. Camera!!), this is where YOU select where the focus will be.

Here is an example of the focus points that would show up on your camera. Yours could have more points than this example. Either way, you would select the one that is on your person's eye and the camera should focus on that point. May sound hard to do but once you get quick at changing that it isn't that hard to do.


For more explanation, go to THIS link to a super short video on selecting the focus. 

Key things to remember:
1. Press the shutter release halfway to focus on the subject.
2. Change the focus point if necessary.
3. Take the photo by pressing the shutter release all the way.

Be careful with the 'set and recompose' idea from the video because if your aperture is low, then you will get a blurry picture. So use that with caution!

Other people swear by back button focusing, but I have not been able to get the hang of that. HERE  is a link for more info on that method of focusing in case that method works for you.

Today's challenge is to practice taking photos by toggling focus points or back button focusing. Share your favorite photos!

Please be a fan of lil Mop Top on facebook!! I link up to these parties!

Cropping Photos and Rule of Thirds

So let's chat about cropping. Sometimes you just need to crop a photo to make it look better for a variety of reasons. The main idea to go by is the Rule of Thirds (ROT). To save myself from reinventing the wheel, here is a link from I Heart Faces which explains what that is. Go ahead...read it...I will wait for ya...

When shooting, you can try to take the original photo with the ROT in mind, but I am not good at all with that. And my kids move too fast. So sometimes I get it right in the camera. However, being that I am more of a 'take lots of photos and hope something turns out' type of person, lots of times I need to crop.

So if you have a program to edit photo, then you will need that. I use Lightroom but that isn't free. A free program that might work for you guys is PicMonkey. I haven't played with it much but from what I can see it will at least crop your photos!

So, as you saw in the I Heart Faces link, you can crop so that you have your focal points at the intersection points. Most of the time I crop as a 4x6 since that is how I will print most pictures. I can't always get it to be PERFECTLY lined up with ROT but I get it as close as I can and call it a day.

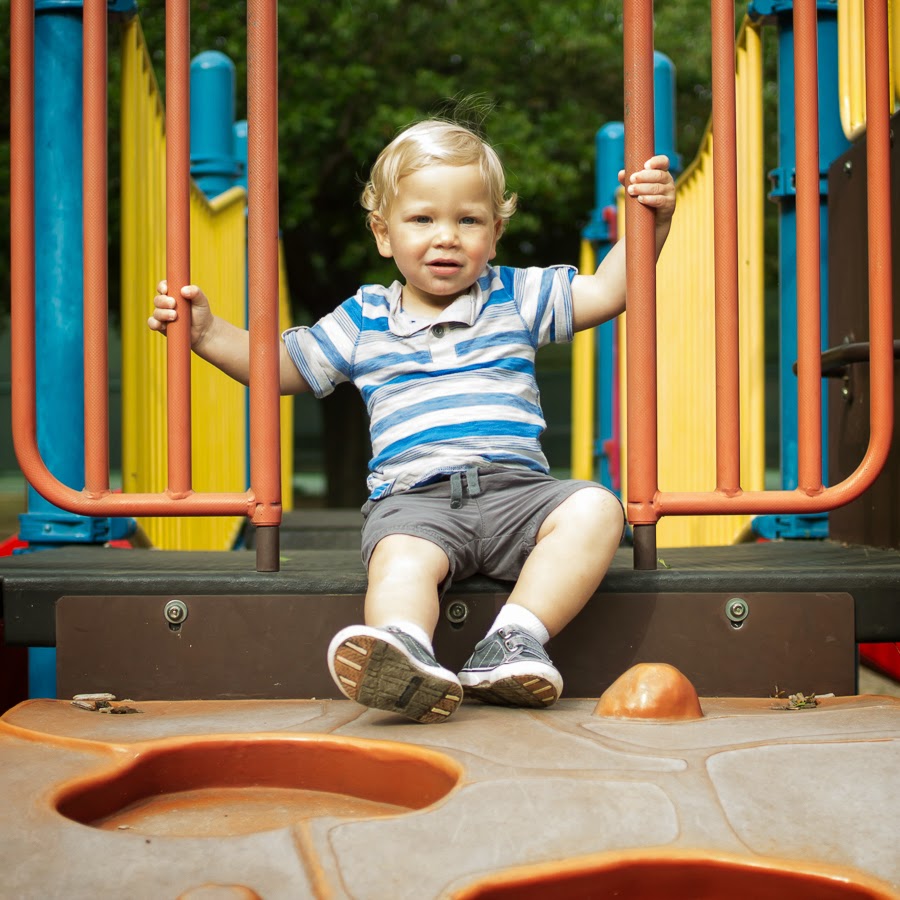
However, you can also crop as a square crop. This is good for symmetrical photos. For example, this one of Thomas is a square crop because it symmetric down the middle vertically. (Do you remember your geometry?!)


I also cropped this one that Allison took of the cousins as a square crop because the leading lines of the railings made it seem more symmetrical to me.

Remember that just because you took the picture horizontally, or in landscape, doesn't mean the crop has to stay that way. You can crop it vertically and see if you like that version better. For example, I cropped this image of the three boys three ways:

horizontally:

vertically:
 square

I like the horizontal one best and almost hate the vertical crop (unless I was super awesome at photoshop and could take out the other boys' chopped arms and even then I don't think I would like it). So know you have options even if they don't all look great. :)

The last thing to remember is not to awkwardly crop off body parts. If you have a full body photo then be sure not to crop off toes, finger tips, etc. Here is a diagram of acceptable crop lines (green) and lines to avoid (red). (via PetaPixel)


Of course after you know the 'rules', then you are free to break them. I have seen lots of photographers who like to center their subjects or crop at 'unacceptable' locations. That is cool, too. I just think it is important to practice a bit of the ROT and cropping, then decide what you like better later for your own personal style.

YOUR challenge now is to take pictures keeping the ROT in mind. Then play with cropping to see if your photo looks better with a horizontal crop, vertical crop, or a square crop.

If you are well versed in the ROT, try to take photos of something you don't usually photograph. If you usually photograph your children, try to practice ROT with objects or nature instead. If you typically photograph landscape, try your hand at photographing people or animals. Street photography anyone?! I find myself always photographing in landscape so I am going to try to work on forcing myself to take more vertical portrait photos.

Share some of your favorites on our group page on facebook!!

Please be a fan of lil Mop Top on facebook!! I link up to these parties!

Shooting at Different Angles

When I took an online class on composition, my favorite tip was shooting at different angles, especially in terms of cutting out parts of the background to make a cleaner picture. There are three ways you can photograph someone: from below, from above, and straight on.

From below gives a feeling that the subject is bigger, bolder, stronger, dominant, etc.
I LOVE this one of John at his t-ball game when I shot from below. He looks like a powerful player here!


Tyler looks extra manly in this shot. :) This also helps to make sure the horizon line, or the line of the back of the lake, doesn't cross with Tyler's head which would make it look awkward.

This is one of my favorite photos of Matthew when he was dressed up as Superman. This angle again helps to make him look bigger and stronger...just like Superman! Notice shooting from below also cuts out the house next door and tree from around Matthew's face which minimizes distractions in the photo.

Shooting from below here helps cut out the messiness of the background and Thomas' face is now in sky rather than with the trees and buildings around the face.

From above gives a feeling that the subject is smaller, meeker, more vulnerable, etc.
Even though this photo of Bella is just a smidge above her, the angle accentuates her tiredness in this photo from her aunt's wedding. She was worn out!


In this photo of Thomas, we were playing on a see-saw at the park. I stood on the see-saw to take this photo from above which cuts out the background of the park and instead puts a cool textured background.


This is another example of how shooting from above cuts out the background. You would never know Emma and Lilly were at the boys' baseball games here! Instead you see their sweet love for each other!


My husband took this photo from above and I love how small John looks here with me.

This shot from above is so sweet of Bella and my mom and gives a tenderness to the photo.

Everyone looks so small against the large lake in this photo from above.


John looks small here and I will remember how he was a typical boy playing in the mud when he was a little boy.


John looks so sweet and innocent here, and again the messy house is cut out of the background without even having to clean!


Taking the photo straight on gives a sense of intimacy, connection to the subject, and you are looking into their world.
I like these as 'observing' into the world of my kiddos and our family. Brad took this one during my Mother's Day breakfast in bed.

Here is Matty B in his cool shades and we are connected to him since we are eye level with him.

 A sweet shot of Emily and Emma is eye level and you can see their love here!

Matthew is again connected to us by shooting him at eye-level.

Since I took this photo from outside the room, we are observing the boys in their world as they play with the ipad in the morning in my bed.


YOUR challenge for today is to practice shooting at different angles. Try the same pose from all three angles (if you can do it before your toddler runs away!). See if shooting at different angles cuts out messy backgrounds. Stand on a chair or lay on the ground if you need to.

If you need more of a challenge for angles, try to take photos with dramatic angles. Try shooting from directly above (like bird's eye view) or directly below. Or perhaps shoot in an angle that you don't typically use to go out of a comfort zone.

I can't wait to see what you come up with!


Please be a fan of lil Mop Top on facebook!! I link up to these parties!