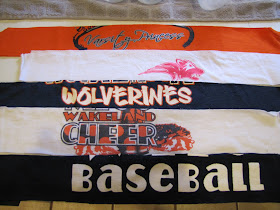
I took this pile of stuff...

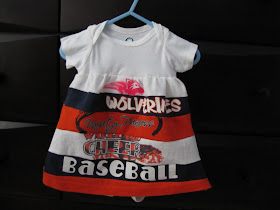
and turned it into this...

Seriously, how cute is this little baby dress?! Let me explain a little bit about the design. When I was teaching, I was the Varsity cheer coach for a couple years. Once I had John, I stopped coaching cheer because it takes up a TON of time and I obviously wanted to be home with my precious new baby. My assistant coach, Lauren, took over for me. Well, she had a baby 3 months ago and Lauren's hubby coaches baseball at the school, thus she will be taking baby Piper to games all the time. Soooooo, I wanted to make her a cute outfit using my old WHS shirts since I don't really have use for them right now. And let me tell you, when you coach a high school cheer squad, you get TONS of shirts. Multiply that over 4 years, I have WHS shirts coming out my ears!
So, here is how I did it and hopefully it makes sense to you! I am already thinking of new versions, so hopefully I can crank out another tutorial or two soon
Supplies:
-spirit shirts (or any old t-shirts)
-onesie
-sewing supplies such as sewing machine, thread, rotary cutter, etc.
1. I cut the cute parts of the shirts into strips that were about 1-2 inches wide. I just kind of lined them up to see how I wanted it to be on the dress. What I for sure wanted was the top strip to be the same color as the onesie, so it blended well. I also cheated by making the bottom strip the original hem from one of the t-shirts. Yay for no hemming in this project!

2. Once I found an order and placement I liked, I sewed the strips together, first pinning right sides together. {NOTE: If I was going to sew this dress again, I would have placed the strips better. I wanted some of the wording purposefuly to the side of the dress, but I didn't offset it enough. I think it looks like I just didn't center everything correctly. Just a little FYI!} After sewing all the strips together, iron along all the seams.


3. I did the same thing with plain strips for the back of the dress. I used the back of the shirts so they are the same colors...{and actually just cut them out all at once.}

4. I then set my stitch length as long as it would go on my machine and set the tension tight. I sewed across the top of the front and back piece so that it gathered it up. DO NOT back stitch at the beginning or end when you sew this time!

5. I needed to figure out how wide I wanted the front piece to be. SO I layed it across the onesie and kind of folded it around the onesie until I found a width I liked. Then using a disappearing marking pen, I marked on the sides where to sew.

You can barely see in the below picture some purple marks on the material that marks a diagonal line on each side. I cut a diagonal line about an inch past each purple line so I had a nice edge instead of all the scrappy edges hanging around. I only did this to the front piece.

6. I layed the back piece face up on my counter and then layed the top piece face down. I pinned the sides and sewed along each side, using the front piece side edges as a guide.


7. Trim your edges on the back piece (which I think is much easier than cutting the front and back piece before sewing and hoping they match up!).

8. Ok, let's see if I can explain this part! I kept the dress part inside out and slid the onesie into the top opening of the dress. Make sense?! :) Maybe the picture will help! (Make sure the front of your dress is facing the front of the onesie!

I pinned the dress around the onesie, lining up just under the arm pit. Sew around the edge of the dress, making a complete circle.
9. Flip the dress over the onesie and you are done! (unless you have some mistakes you need to fix like I did!) Admire your work...and if you are like me, become amazed that this project actually turned out well and cute to boot!
Front:

Back:

I already showed a picture of this to Lauren and she loves it! Yay! I can't wait for her to have Piper wear it and see what it looks like on a real live baby. :)
I am totally picturing A&M dresses for my next one. Hopefully I have a lil Aggie to sew for soon. I may or may not be looking in a certain someone's direction...
If you make one of these, I would LOVE to see how it turned out! And if you have some ways to make it easier, help a girl out, will ya?!
I link up to these parties!


Super cute idea!! I'm just getting back intwo sewing, AND have a baby. I might have to try something like this!
ReplyDeleteSo super cute! Thanks for sharing!
ReplyDeleteHow creative. Love it. Piper is a very lucky little girl to wear this dress.
ReplyDeleteAdorable! I'm visiting from Tip Junkie.
ReplyDeleteHave a great week!
Love, Brenda
So cute!! Great job!
ReplyDeleteGenius. We have more t-shirts than I can count here from past team sport participation. I was actually just saying it was time to toss them. But with a 6 month old granddaughter, this is such a cute idea !
ReplyDeleteDarling! I am featuring this at somedaycrafts.blogspot.com.
ReplyDeleteI forgot to say grab my "featured" button.
ReplyDeletewhat a wonderful idea!
ReplyDeleteI am having 2 giveaways on my blog.A chance to win $15 store credit from LiaGeneFab11 who has fancy headbands and hair clips for your daughter. and a fairy silhoutte tee from ElizabethHorton. Just leave a comment to win. http://houseonashwelllane.blogspot.com/2011/02/fancy-headbands-and-hair-clips-giveaway.html
Very cute! I love sewing for kids.
ReplyDeletewww.ribbonsandricrac.blogspot.com
Such a fun idea! I would love to feature this project on my blog, Reduce, Reuse, Upcycle.
ReplyDeleteThanks!
http://reuseandupcycle.blogspot.com
This is so cool.....
ReplyDeleteMaria
Just so you know, the feature will go up on the 27. Come by and grab a featured button.
ReplyDeleteThanks!
http://reuseandupcycle.blogspot.com
this is so cute! I used to make baby dresses similar to this when my girl was little. Mine never turned out this well.....
ReplyDeleteI LOVE this. How easy to use a onesie as the top part! Thank you so much for linking to Upcycled Awesome!
ReplyDeleteThat turned out super cute! I coached varsity cheer before I had kids, too!
ReplyDeleteThe best and proper way to make my champ get started right from the first.
ReplyDeleteVery cute. Here's an idea though: why not skip the onesie and just make into a pillowcase style dress with matching ribbons on the shoulders? I feel like that'd be even easier!
ReplyDeleteGreat post. I hope she love this school spirit wear as much as I do. What a cute idea! Why didn't I think of that!
ReplyDeleteThis comment has been removed by the author.
ReplyDeleteAmazing!This is really so nice.Infantt-shirt.I really appreciate you for this outstanding job.I like your post.Thanks for sharing it.
ReplyDeleteGreat post. Making the babies get in the school spirit shirts.
ReplyDeleteAwww....She's going to be the cutest little bundle of school spirit adorableness!!! Very nicely done. I love it.
ReplyDelete